Smart home security devices have become increasingly popular as homeowners look for convenient ways to monitor and protect their property. One of the most widely used smart security devices today is the Ring Video Doorbell, developed by Ring. This device allows users to see, hear, and speak to visitors through their smartphone, tablet, or computer. With built-in motion detection and video recording, the doorbell provides an additional layer of security for homes and apartments.
Installing a Ring Doorbell may seem complicated at first, but the process is actually simple and can usually be completed in less than an hour. Whether you choose a battery-powered model or a wired version connected to your existing doorbell system, the setup steps are straightforward. In this guide, we will explain how to install a Ring Doorbell step by step, including the tools you need, the installation process, and how to connect the device to your phone.
Understanding the Ring Doorbell
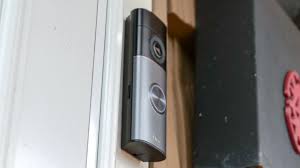
The Ring Video Doorbell is a smart doorbell equipped with a high-definition camera, microphone, speaker, and motion sensors. When someone approaches your door or presses the doorbell button, the device sends a notification to your smartphone. Through the companion mobile application, you can view a live video feed, communicate with visitors, and monitor activity outside your home.
Most Ring Doorbell models connect to Wi-Fi and are controlled using the Ring App. The app allows users to adjust motion detection settings, view recorded videos, and receive alerts. This integration between hardware and software makes it easy to manage home security from anywhere.
Tools and Equipment You Need
Before beginning the installation process, it is important to gather the necessary tools and equipment. Most Ring Doorbell packages include installation materials such as screws, a mounting bracket, and a charging cable for battery models.
You may also need a screwdriver, a drill for certain wall types, and a level tool to ensure that the doorbell is mounted straight. If you are installing a wired model connected to an existing doorbell system, you may need to turn off power at your circuit breaker before starting the installation.
Preparing the tools in advance helps ensure a smooth installation process and reduces the chance of interruptions during setup.
Step 1: Charge the Doorbell Battery
If you are installing a battery-powered version of the Ring Video Doorbell, the first step is to charge the battery fully. Connect the doorbell to a power source using the included USB charging cable.
The charging process may take several hours, depending on the battery level. Once the battery is fully charged, the indicator light on the device will show that it is ready for use. Charging the battery before installation ensures that the doorbell can be set up and tested immediately after mounting.
Step 2: Download and Set Up the Ring App
The next step is to install the Ring App on your smartphone. The app is available for both Android and iPhone devices through the Apple App Store and the Google Play Store.
After downloading the app, create a Ring account or log in if you already have one. The app will guide you through the process of adding a new device. During this step, you will scan a QR code located on the doorbell or its packaging.
Once the device is recognized, the app will prompt you to connect the doorbell to your home Wi-Fi network. A stable Wi-Fi connection is essential for video streaming and receiving notifications.
Step 3: Turn Off Power (For Wired Installation)
If you are replacing an existing wired doorbell, you should turn off the power supply at the circuit breaker before starting installation. This step is important for safety and helps prevent electrical accidents.
After turning off the power, remove the existing doorbell from the wall by unscrewing it. Carefully disconnect the wires attached to the old doorbell and set the device aside. These wires will be used to connect your new Ring Doorbell.
Battery-powered models do not require this step because they operate independently of existing wiring.
Step 4: Install the Mounting Bracket
The mounting bracket is the piece that attaches the doorbell securely to your wall or door frame. Hold the bracket against the wall in the location where you want to install the doorbell. Ideally, the doorbell should be positioned about four feet above the ground for the best camera angle.
Use a level tool to ensure the bracket is straight before marking the screw holes. If you are installing the doorbell on brick, concrete, or stucco surfaces, you may need to drill pilot holes and insert wall anchors before securing the bracket.
Once the bracket is aligned properly, use the provided screws to attach it firmly to the wall.
Step 5: Connect the Wires (If Applicable)
For wired installations, connect the existing doorbell wires to the terminals on the back of the Ring Video Doorbell. The wires can be attached in either order, as the doorbell does not require a specific polarity.
After attaching the wires, carefully push them back into the wall and align the doorbell with the mounting bracket. Once everything is positioned correctly, snap the doorbell into place or secure it using the provided screws.
Battery-powered models skip this step and simply attach directly to the mounting bracket.
Step 6: Secure the Doorbell
After connecting the wires or inserting the battery, place the doorbell onto the mounting bracket. Tighten the security screws at the bottom of the device to prevent it from being easily removed.
These screws require a special screwdriver included in the installation kit. Securing the doorbell ensures that it remains firmly attached and protected from tampering.
Step 7: Test the Doorbell
Once the installation is complete, restore power to the circuit if you installed a wired model. Open the Ring App and follow the instructions to complete the setup process.
Press the doorbell button to test whether the device sends a notification to your phone. You should also check the live video feed to confirm that the camera angle is correct and that the motion detection feature is working properly.
Adjust settings in the app if necessary to improve the viewing area or reduce unnecessary alerts.
Adjusting Motion Detection and Alerts
After installation, you can customize motion detection settings within the app. These settings allow you to control how sensitive the motion sensors are and which areas around your door trigger notifications.
For example, you can set motion zones that focus only on your doorway and ignore passing cars or pedestrians. This helps reduce false alerts while ensuring that important activity near your door is captured.
You can also enable features such as motion recording and real-time notifications for enhanced security.
Maintenance and Care
Maintaining your Ring Doorbell is relatively simple. For battery models, you will need to recharge the battery periodically depending on usage and motion activity. Most users recharge the battery every few weeks or months.
It is also a good idea to clean the camera lens occasionally to ensure clear video quality. Dust, rain, or fingerprints on the lens can affect image clarity.
Regularly checking your Wi-Fi connection and updating the device software through the app can also help maintain optimal performance.
Conclusion
Installing a Ring Video Doorbell is a simple and effective way to enhance your home security. With features such as motion detection, live video streaming, and smartphone notifications, this smart device allows homeowners to monitor their front door from virtually anywhere.
By following the steps in this guide—charging the battery, setting up the Ring App, installing the mounting bracket, and connecting the device—you can complete the installation quickly and easily. Once set up, the doorbell provides continuous monitoring and convenience, making it a valuable addition to any smart home security system.


Leave a Reply